


The short video below walks through a complete example: creating a new Slate, uploading a Slate image, associating it with Channel IDs, reviewing targeting assignments, viewing Slate details, checking audit history, editing channel associations, and deleting a Slate.
The Blackout Management module lets you manage Slate images that are displayed when live content cannot be shown because of blackout restrictions, such as regional broadcast rights limitations. Instead of viewers seeing an interruption or blank screen, the configured Slate is displayed until regular playback can resume.
Each Slate consists of:
A Slate image
A Slate title
Targeting configuration
Audit history for traceability
A Slate can be targeted in one of two ways:
Apply to all channels
Associate with specific Channel IDs
The module is opened from the sidebar under its Blackout Management entry in OpsHub.The main screen shows a table of all configured Slates. From there you can:
Search the list
Filter by targeting type
View Slate details
Create a new Slate, if you have edit permission
Edit Slate targeting, if you have edit permission
Delete a Slate, if you have edit permission
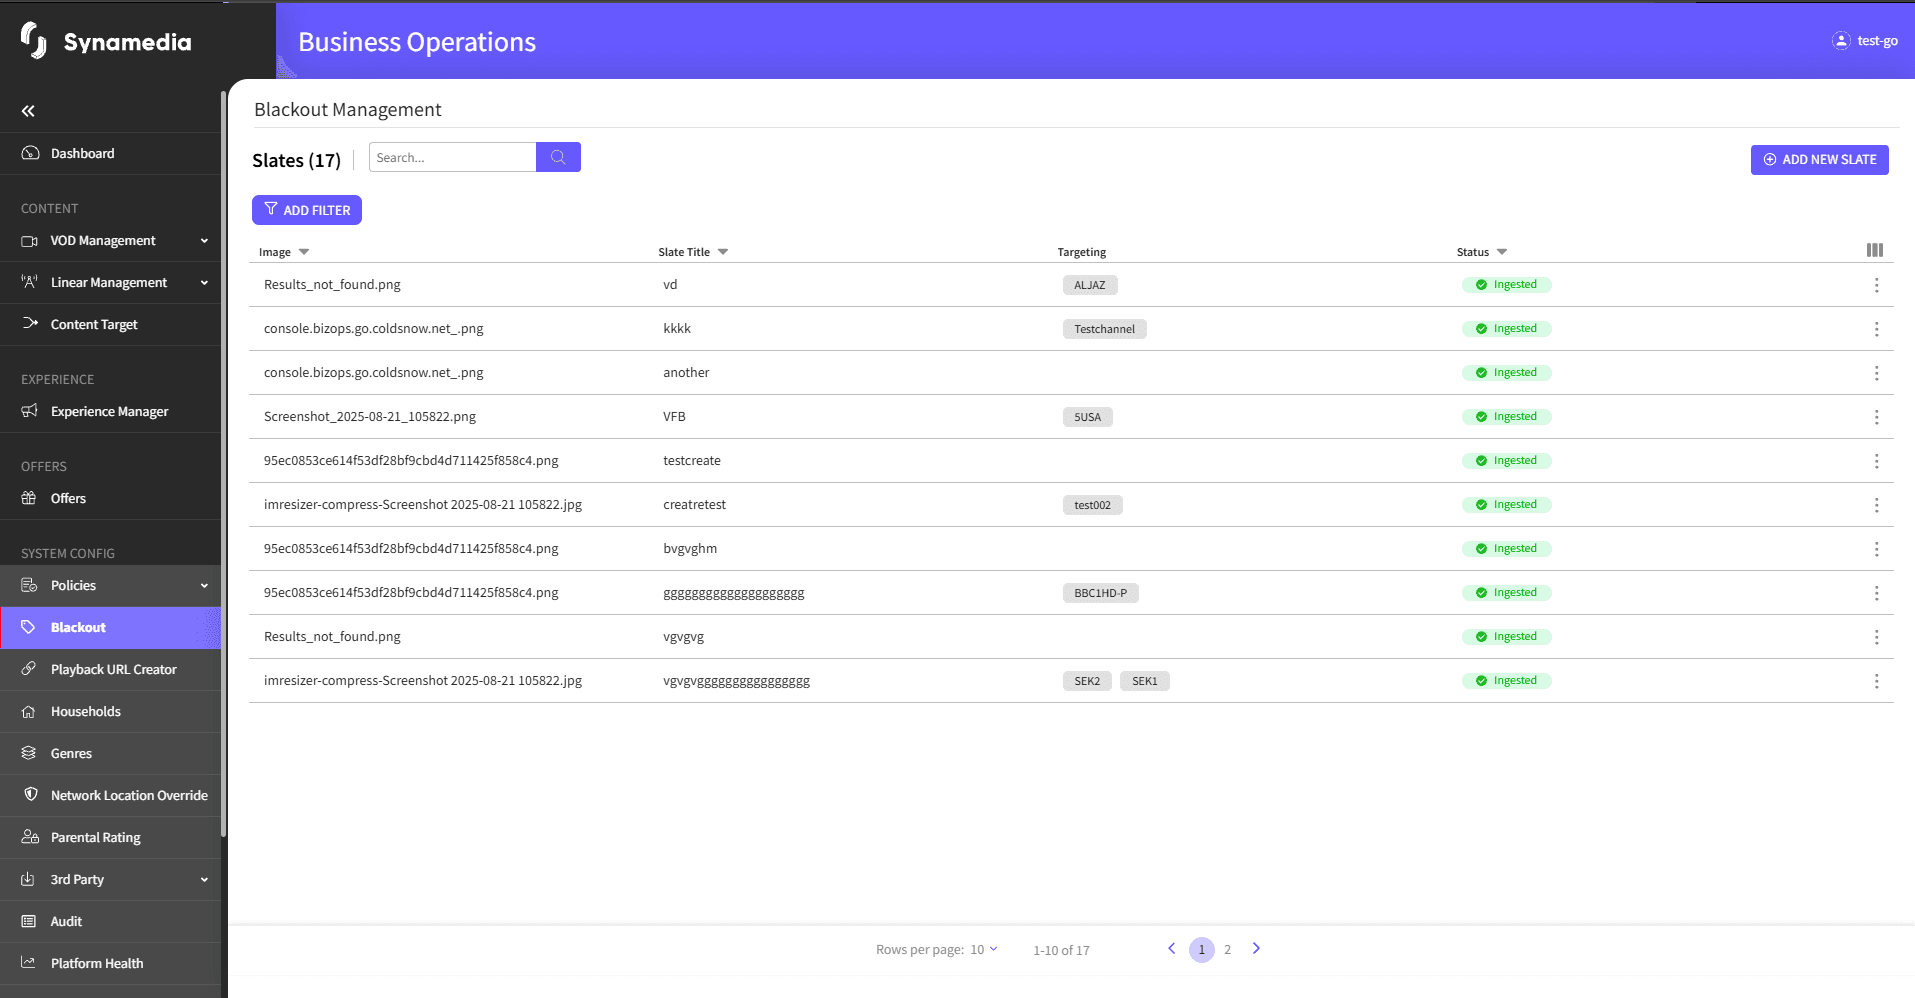
Blackout Management Main Screen
Each Slate can be configured using one of the following targeting options:
The Slate becomes the default blackout image for every channel that does not have a specifically assigned Slate.
The Slate is associated with one or more individual Channel IDs.Channel IDs can be entered:
One at a time
As a comma-separated list
Through the channel selection interface
A Channel ID can belong to only one Slate at a time.If a Channel ID is already assigned to another Slate and is added to a new Slate:
OpsHub displays a warning
Saving the new Slate overrides the previous association
The Channel ID becomes associated with the newly saved Slate
Warnings appear only after a conflicting Channel ID is entered.
The main table is titled "Blackout Management" and shows the following columns:
Slate Image
Slate Title
Targeting
Last Updated
Actions
You can:
Search the list using the search box
Filter by Targeting type
Sort by Slate Title and Last Updated
Open a row to view details
Delete a Slate
Click "ADD NEW SLATE"
The create flow contains two steps:
Upload Slate
Associate Channel IDs
In this step you:
Upload a Slate image
Enter a Slate title
Slate Image
Slate Title
Only supported image formats can be uploaded
A Slate image preview is displayed after upload
The image upload is processed immediately after selection
The "NEXT" button remains disabled until validation succeeds
Users can replace the image before moving to the next step
If the upload or validation fails, OpsHub shows an error message and allows the user to retry
In this step you configure where the Slate will be used.
Choose one of the following targeting options:
Selecting this option makes the Slate the default blackout image for all channels.No Channel IDs are required.
Use the Channel selector to:
Search available Channel IDs
Select one or more Channel IDs
Remove individual Channel IDs
Clear all selected Channel IDs
A Slate must have a targeting configuration before it can be saved
A Channel ID can belong to only one Slate
Conflict warnings are shown when a selected Channel ID is already assigned elsewhere
Saving applies the new association as an override
Typical warning message behavior:
Warning appears beneath the associated Channel IDs section
Warning lists channels that already belong to a different Slate
Users may continue and save anyway
After the Slate image and targeting have been configured:
Click
"ADD SLATE"
to save
OpsHub validates the image and targeting configuration
If Channel ID conflicts exist, saving still succeeds and overrides previous associations
If saving fails, an error message is displayed and the user can retry
After a successful save:
The Slate appears in the Blackout Management table
The targeting configuration becomes active immediately
Click any row in the list to open the side panel.The side panel contains two tabs:
Details
Audit
The panel header displays:
Slate title
Last verified update information
The Details tab shows:
Slate Image
Slate Title
Targeting Type
Associated Channel IDs
Users can preview the configured Slate image directly from the Details tab.Current OpsHub behavior:
Slate title is displayed as read-only
Slate image replacement is not supported from the side panel
Channel associations can be edited
Targeting changes take effect after saving
If details cannot be loaded, the panel displays an empty state message.
If you have edit permission, use the "EDIT" action from the Channel Associations section.
You can:
Add Channel IDs
Remove Channel IDs
Search available Channel IDs
Switch between targeting modes where supported
Newly added conflicting Channel IDs display warnings
Existing associations do not display warnings unless modified
Saving overrides any previous Slate assignment for conflicting Channel IDs
To save changes:
Click
"SAVE CHANGES"
To discard changes:
Click
"CANCEL"
If saving fails:
Draft changes remain intact
An error message is shown
The user can retry
Users can preview the configured Slate image from:
The Details tab
The Create Slate workflow
The preview helps verify:
Correct image selection
Image quality
Branding and visual appearance
Blackout messaging
Click the delete icon at the end of a row. A confirmation dialog appears.
The dialog asks the user to confirm deletion
If the Slate has associated Channel IDs, the dialog lists affected channels
Deleting the Slate removes those channel associations
Channels previously associated with the deleted Slate will no longer use that blackout image
Users can:
Click
"Delete"
to confirm
Click
"Cancel"
to keep the Slate
Blackout Management visibility and actions are permission-based.Typical behavior:
Users with view permission can access the module, browse configured Slates, view details, and view audit history
Users with edit permission can create, edit, and delete Slates
The
"ADD NEW SLATE"
button is visible only to users with edit permission
If a user does not have view permission, the Blackout Management page is not displayed.
Each Slate maintains a complete history of changes.Open a Slate and select the "Audit" tab to view recorded actions such as:
Slate creation
Channel association updates
Targeting changes
Slate deletion
Other tracked service events
Use the audit timeline to identify:
What changed
When it changed
Who performed the action
When a blackout occurs, OpsHub determines which Slate should be displayed using the following logic:
Check whether the channel has a specifically assigned Slate.
If found, display the channel-specific Slate.
If no channel-specific Slate exists, display the Slate configured for
Apply to All Channels
If no matching Slate is available, the system follows the platform's configured blackout fallback behavior.
When channel assignments overlap, the most recently saved association becomes active.
Use clear and recognizable Slate titles so blackout configurations are easy to identify.Before saving:
Verify the uploaded image is the correct asset
Review Channel ID associations carefully
Check conflict warnings before overriding existing assignments
Use channel-specific Slates only when necessary
Reserve the "Apply to All Channels" Slate for default blackout messaging
Regularly review audit history to ensure blackout configurations remain accurate and up to date.
Remember that deleting a Slate also removes all of its channel associations. If a channel still requires blackout coverage, assign it to another Slate before deleting the existing one.

